Introduction
When it comes to performing CPR, positioning is crucial for both the rescuer and the patient. The pocket mask CPR rescuer position significantly impacts the effectiveness of the procedure, ensuring a seamless delivery of rescue breaths alongside chest compressions. This article will delve into expert techniques that enhance your positioning as a rescuer while using a pocket mask. Knowing the optimal position and employing effective techniques can save lives, making this knowledge imperative for anyone involved in emergency response.
Understanding the Pocket Mask
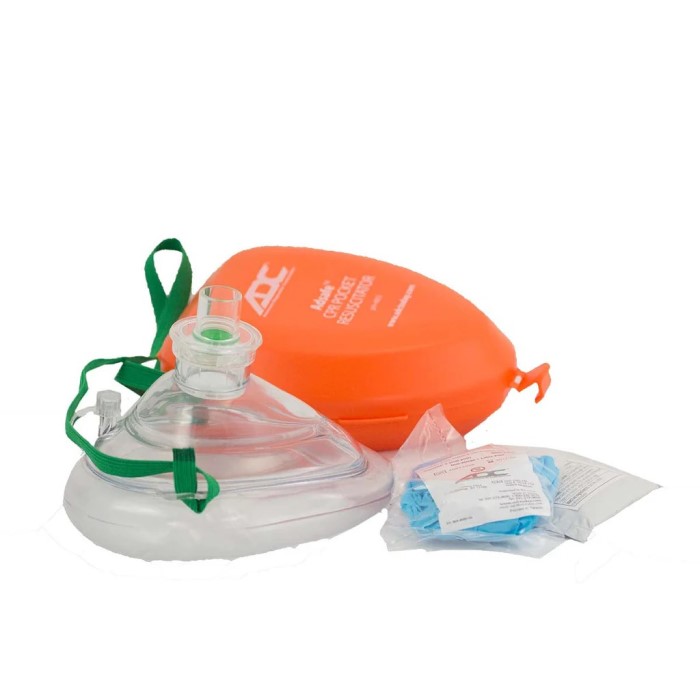
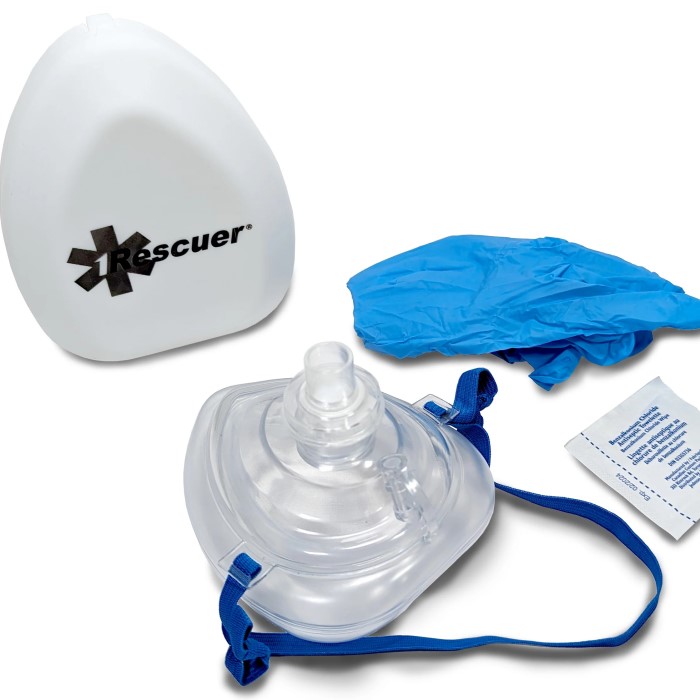
The pocket mask is a life-saving device designed to provide rescue breaths during CPR. It creates a seal around the patient’s mouth and nose, allowing first responders to deliver oxygen while minimizing the risk of infection. Understanding the anatomy of a pocket mask, including the one-way valve and how it seals effectively, is essential for maximizing its efficacy in emergencies.
The mask is typically made from durable, transparent plastic, which allows the rescuer to monitor the patient’s breathing. It often comes with a built-in filter to prevent contamination. Furthermore, the pocket mask’s compact size makes it easy to carry, making it a valuable tool in both personal and professional settings.
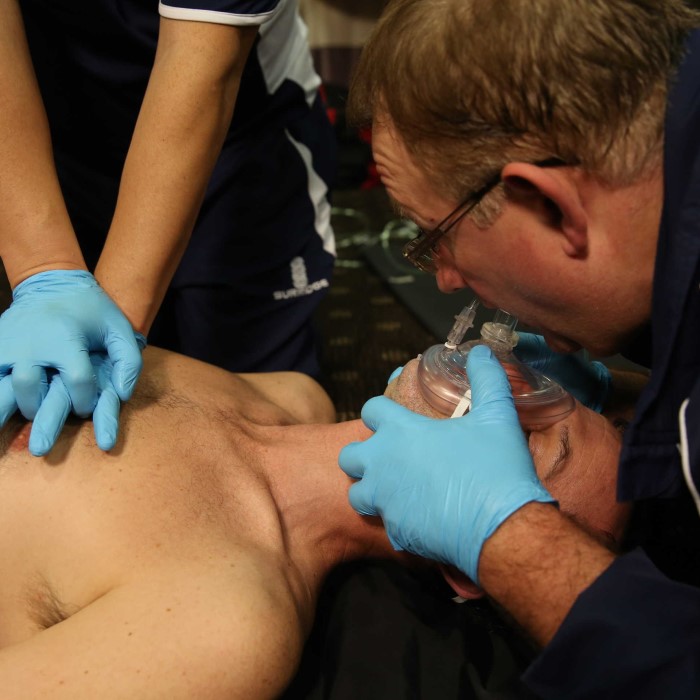
The Importance of Proper Positioning
Properly positioning yourself as a rescuer can enhance the effectiveness of CPR. A well-executed pocket mask technique not only maximizes the delivery of oxygen but also reduces the chances of airway obstruction. The ideal pocket mask CPR rescuer position allows you to maintain optimal body mechanics while ensuring effective breaths are delivered.
The American Heart Association (AHA) emphasizes that positioning significantly influences the quality of CPR. Inadequate positioning can lead to reduced circulation and ineffective rescue breaths. Therefore, understanding how to position yourself correctly is vital for any rescuer.
Where Should the Rescuer Be Positioned?
- Kneeling beside the Patient
Ideally, the rescuer should kneel beside the patient’s side, at or near their shoulders. This positioning enables the rescuer to maintain good body mechanics and leverage while delivering compressions and breaths. - Head and Neck Alignment
Align the patient’s head and neck properly to ensure an open airway. This can involve tilting the head back slightly and elevating the chin. Proper alignment is crucial to prevent airway obstruction when using the pocket mask. - Firm Grip on the Mask
While maintaining the pocket mask in place, position your hand securely on it. With one hand, create a C-shape around the mask, pressing it firmly against the patient’s face. Ensure a tight seal to prevent air leaks during breaths. - Positioning Your Body
Your body should be positioned directly above the mask to deliver effective breaths. Lean forward slightly while keeping your elbows braced against your knees for stability. This body positioning allows for adequate pressure to create a secure seal, while also enabling easy observation of the patient’s chest for adequate rise during breaths.
Where to Stand When Using a Pocket Mask
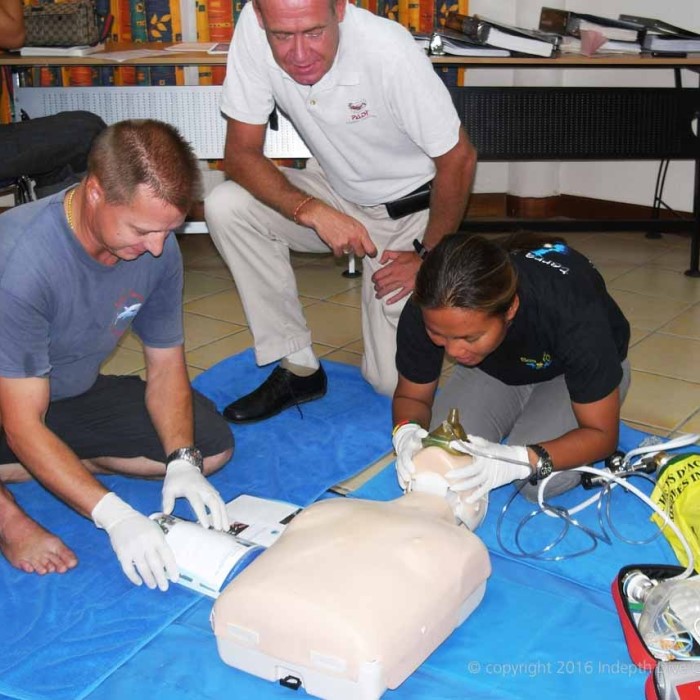
In scenarios where a second responder is present, the layout changes slightly. One rescuer may continue delivering compressions, while the other utilizes the pocket mask. In such cases, the rescuer with the mask should stand at the patient’s head, while the other responder kneels beside the patient’s side, assisting with compressions as needed.
- Communicate Clearly
Effective communication is essential, particularly during high-stress situations. Ensure that both rescuers maintain clear lines of communication throughout the process. Establishing roles and responsibilities can alleviate confusion, allowing for a more effective response during emergencies. - Switching Positions
Rescuers can switch positions as fatigue sets in, ensuring that high-quality compressions are maintained. The training protocols emphasize that even slight changes in pressure or positioning can affect the effectiveness of rescue breaths. Therefore, constantly assessing the situation and adapting accordingly is essential.
How to Use a Pocket Mask in CPR
Perform Chest Compressions
- Initiate High-Quality Compressions
Before administering rescue breaths, it is essential to begin with high-quality chest compressions. This establishes circulation in the patient’s body during cardiac arrest. Compressions should be initiated promptly to maximize the chances of survival. - Compression Rate
The recommended rate for chest compressions is between 100 to 120 compressions per minute. This brisk tempo aids in maintaining blood flow to vital organs. A metronome or the rhythm of a song at 100-120 beats per minute can help keep time. - Applying Sufficient Force
Each compression must be both strong and effective. The force must be sufficient to compress the chest adequately, ensuring that the heart generates blood flow. It’s important to keep the pressure consistent throughout the compression cycle. - Depth of Compressions
Aim for a depth of approximately 2 to 2.4 inches (5 to 6 cm) for adult patients. This depth is crucial for compressing the heart effectively and facilitating blood circulation. Each compression should push down and then allow full chest recoil between compressions to maximize blood return to the heart. - Positioning and Body Mechanics
Position yourself correctly to deliver compressions. Kneel beside the patient’s chest and place the heel of one hand in the center of the chest, with the other hand stacked on top. Keep your arms straight and use your body weight to perform the compressions effectively. This technique reduces fatigue, allowing you to maintain effective compressions for longer periods.

Seal and Deliver Breaths
- Transitioning to Rescue Breaths
After performing 30 compressions, it is time to switch gears and prepare to deliver rescue breaths using a pocket mask. Transitioning smoothly between compressions and breaths is essential for effective CPR. - Positioning the Pocket Mask
Place the pocket mask securely over the patient’s mouth and nose. Ensure that it covers both areas entirely to create an airtight seal. This secure placement is crucial for reducing the risk of air leakage during breaths. - Creating a Secure Seal
Use the hand placed at the base of the mask to pinch it tightly against the patient’s face. This creates a seal that prevents air from escaping. A poor seal can lead to ineffective breaths, undermining the goals of CPR. - Opening the Airway
With your other hand, gently lift the patient’s chin to open the airway. This maneuver helps to align the throat and ensures that the breathing passages are clear. Make sure to tilt the head back only slightly to avoid obstructing the airway further. - Checking for Responsiveness
Before delivering breaths, take a moment to check for any signs of responsiveness. Gently shake the patient’s shoulders or call out to them. If they are unresponsive, continue with the rescue breaths as planned.
Deliver Two Breaths
- Administering Rescue Breaths
Deliver two rescue breaths after ensuring a secure seal and an open airway. Each breath should be about one second long, which allows the air to flow into the lungs without causing over-inflation. - Observing the Patient’s Chest
As you deliver each breath, watch for visible chest rise. This rise indicates that the air is entering the lungs effectively. If the chest does not rise, reassess the seal and airway positioning before attempting to deliver an additional breath. - Breath Technique
The proper technique involves giving each breath a slow, steady force to avoid forced air intake. Remember, the goal is to deliver just enough air to create chest rise without excessive pressure. Too much force can lead to complications such as gastric inflation. - Timing Between Breaths
After the first breath, pause briefly to observe the chest rise and allow the oxygen to circulate. Follow up with the second breath shortly thereafter, maintaining the same technique to ensure effective airway management.
Resume Compressions
- Return to Chest Compressions
Immediately after delivering two rescue breaths, return to chest compressions without delay. The rapid transition is essential to maintain blood circulation and ensure that the patient continues to receive adequate care. - Continuing the Compression Cycle
Establish a continuous cycle of 30 chest compressions followed by two rescue breaths. This rhythm is critical to effective CPR and maximizes the chances of restoring a viable heart rhythm. - Monitoring the Patient’s Condition
While continuing the cycle, keep monitoring the patient for any signs of consciousness or improvement. If they begin to show responsiveness or normal breathing, modify your approach as needed to support them safely. - Until Help Arrives
Continue delivering high-quality chest compressions and rescue breaths until professional help arrives or the patient begins to regains signs of consciousness. Sometimes, maintaining this rhythm for several minutes can be necessary before assistance arrives. - Team Efforts in CPR
If there are additional rescuers available, consider rotating roles to prevent fatigue. Ensure clear communication and maintain a steady, effective CPR cadence to provide optimal care to the patient.
What Position Should the Rescuer Be in to Give CPR?
The position of the rescuer during CPR significantly affects effectiveness. Proper positioning can impact not only the quality of compressions but also the ability to monitor the patient’s condition. Here are some practical considerations:
- Kneeling Positions
Rescuers should kneel beside the patient to maintain a clear view. This allows for adjusting the mask and performing necessary checks on the patient’s condition. - Bracing for Support
Use your knees and thighs to brace your arms while administering compressions. This positioning provides stability and helps deliver forceful compressions without risking injury to the rescuer. - Flexibility and Comfort
While maintaining active engagement, be flexible enough to adjust your body as situations evolve. Practice the correct positioning during training sessions to ensure proficiency when it counts.
FAQs About Pocket Mask CPR Techniques
Where should the rescuer be positioned when using a pocket mask?
The rescuer should kneel beside the patient’s shoulders for optimal access and visibility.
Where to stand when using a pocket mask?
Stand directly at the patient’s head, maintaining a secure grip on the mask for proper sealing while monitoring the patient’s chest rise.
How do you use a pocket mask in CPR?
Begin with chest compressions, then place the pocket mask over the patient’s mouth and nose, delivering two effective breaths.
What position should the rescuer be in to give CPR?
The rescuer should kneel next to the patient, maintaining good body alignment and support during both compressions and rescue breaths.
Conclusion: Expert Techniques for Effective CPR Using a Pocket Mask
In conclusion, mastering the pocket mask CPR rescuer position requires practice, proper knowledge, and attention to body mechanics. Understanding how to position yourself effectively while using the pocket mask is crucial for maximizing the efficacy of CPR techniques. Properly administering CPR can significantly impact patient outcomes, especially during emergencies.
By applying the techniques discussed in this article, you equip yourself to respond to emergencies confidently and effectively. Ultimately, ongoing training and practice will ensure that you remain prepared to face any situation with assurance and competence. Remember, every second counts, and your actions can be the difference between life and death.